
This is a continuation of my saga with pendant cords that I started in my Nov. 25, 2011 post. Part of the reason for sharing my problem solving process in such detail is to illustrate how something that seems quite simple and even obvious when demonstrated in a class can represent days or even weeks of experimentation by the instructor.
 Before I started using window blind cord I used Soft Glass plastic cording. I liked it because most of the colors were somewhat muted like the colors in my pendants and I thought the frosted hollow cord looked rather contemporary.
 I wanted the cords to be adjustable so I connected the ends with “sliders” I made from polymer clay. Each slider had one hole drilled part-way through it and a second hole drilled all the way through. The cord was super-glued into the short hole and moved freely through the second hole (below).
This type of closure is works successfully with buna; however I found that the glue caused the Soft Glass cord to become rigid and susceptible to breakage over time. (I have since observed that some artists bring the end of the cord all the way through the slider and tie a knot in the end.)
 The picture on the left shows a variation on my Soft Glass sliders. I made tube beads and then sanded one surface flat on each bead. I glued the flat surfaces of two beads together to make each slider. I still had the problem with the glue, though, and on top of that the two beads sometimes broke apart. I still like the look of the cord and may return to using it for some of my pendants. I have an idea for a mechanical closure that would eliminate the need for glue.
 Window shade cord turned out to be more difficult to work with than I had anticipated. It took weeks of experimentation to come up with the gracefully draped version you see on the right. First of all, the cord ends fray easily. That and the softness of the cord make it difficult to feed the cord through the hole in a pendant almost two inches in diameter.
I tried stiffening the cord with glue, paint, varnish and other liquids with little success until I discovered that I needed to use the thinnest super (cyanoacrylate) glue available. Anything more viscous sat on the surface of the cord instead of sinking in. (The fastest setting cyanoacrylate glue is usually the thinnest.) I soaked the first 2-3 inches of cord with glue, let it dry and stiffen, then cut the end into a point to make a “needle”.

The next thing I experimented with was the sliders. I wanted them to be as unobtrusive as possible, which meant they had to be small, and I wanted to avoid using glue.
My solution after more  experimentation was to roll out a sheet of clay matching the color of the cord as closely as possible, then punch out little ovals. Before firing the ovals I poked dots into the surface where the cord holes would go. After firing I drilled out the holes. The holes had to fit the cord exactly or the slider would be too loose to hold its position after the length was adjusted.

The final challenge was to come up with a way to finish off the connection without using glue. The solution, after I came up with it, seemed obvious. I pulled the end of the cord away from the slider, melted it with a candle and after it cooled pulled it up snug to the slider.
The melted cord-end appeared to be a small bead just a bit darker than the slider – an elegant solution to the problem!
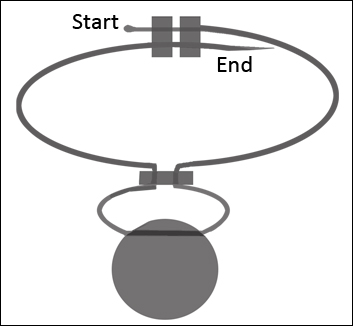
The image on the left shows how to thread the cord through the sliders and pendant in a single direction so that you don’t have to form “needles” on both ends.
For more information on this cord see this earlier post.