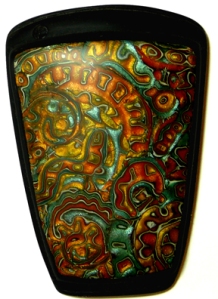
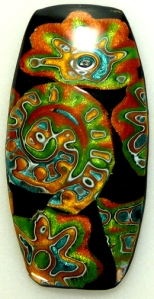
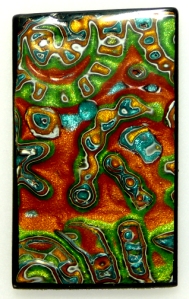
I haven’t had time to do much blogging during the holidays, but I have had time to do more experiments with mokume gane. I’m still working with very thin sheets (1/32 inch) sliced from the mokume billet with my slicer. All of the impressions were made with my handmade impression plates or stamps. In these experiments I cut out sections of the sheets with a craft knife and collaged them over a base of scrap clay to form either patterns or abstract designs. The two pieces shown here were made from slices from the same billet. The slices were so thin, I had to press them against a glass work surface to stabilize them while I cut them.
After firing and sanding a piece, I always have a hard time deciding whether to give it a satiny surface by buffing it on my jeans or go one step further and buff it to a glass-like shine using the buffing wheel. The pendant above was left with a satiny surface while the leaf pin on the right was buffed on the buffer.I have seen many pieces in which the shine is somewhere in between; they were buffed on a buffer but not to the point of having a truly glass-like shine. I find this in-between state less attractive than either extreme, and I think it results from ending the buffing process to soon. This is a suggestion I give my students: Once you decide your piece is “buffed” lighten up the pressure against the buffing wheel (think of a baby’s kiss) and go over the piece thoroughly one more time. This almost always results in a glossier finish.
When I made these pieces I used regular clay rather than scrap clay for the backing because I didn’t intend to overlap the cutouts. I made the piece on the left first. I like the contrast between the metallic clay and the background but I didn’t like the relationship between the shapes and the background (the negative space).
The piece on the right started out the same way but I changed it by cutting some unpatterned sections of my mokume sheet and using them to cover the background.
I have a lot more to show you but this post is getting too long. Watch for an update soon.


I love your work and these pieces are totally amazing! I totally understand what you mean with the buffing. We use a dremel and I make our own buffing pads that work beautifully — especially if you just barely touch the surface with it it quickly goes to a really high shine. Our only problem is that we find that shine does not last. After a few weeks they start to go dull and have to shine them up again. Do you not find that as well?
Thank you, Carolyn. I’ve always assumed that the loss of shine was due to handling. Do your items lose their shine even if they are not handled?
I thought it was from handling or wearing as well but we store our pieces in special drawers lined with soft cloth and they still lost some of their shine over time – they still looked good but didn’t have that real high shine after a while so would buff again. We now glaze most of our pieces for that reason. Wish we didn’t have to but seems to be the only solution for now.
What are the buffing pads you make for the dremel like? I was thinking of trying the dremel on ssome crevaces in my beads.
Wow Carol- those pieces are amazing! I have been treasuring/hoarding the sheets you gave me… what to do…? ;-D
Happy New Year!!
xo
gera
Hi Gera,
Thanks for writing. One thing my experimenting is doing is generating lots of sheets. I wish you were here to take some. I can’t wait to see what other people do with this. You have a wonderful new year too.
Carol
Carol, I can’t wait to try your slicer. If ever you need a European outlet you know where to find me!
Kylee (Lunes Bijoux & Corbières Créatives)
I got the idea to make our own Dremel buffing pads from Desiree McCrorey on her site. I experimented with various materials and the one I found that worked fabulous was the type of “chamois” that is made in Germany (the others made elsewhere are a different type of fiber).
Sorry for taking so long to answer…
Are you willing to share details? Send me a picture and I’ll post it in an upcoming discussion of buffing.
I find that the longer time & higher temp. you can bake at seems to make the buffed shine stay better.
ps i love the color mixes you make with your metalics do you use any thing beside
the available pearl colors-, I find that adding the bright opaque clays deaden the effect of the metalics
thanks
jan m ( jembox)
Hi Jan,
Thanks for commenting. It’s hard to know whether people are interested in what I’m writing and comments really help. I use small amounts of the more translucent of the opaque clays to tint my mixes. Zinc yellow, fuchsia and ultramarine work well. I suspect the new Premo metallics are for the most part mixtures of the old ones with a little opaque color thrown in.
What temp do you use for Premo?
Carol
Hi Carol,
I bake at 285-290 in my house oven unless there is white or plain translucent
I have been working on something i call “mica mush” here is early example in pastels
http://www.flickr.com/photos/jembox/4579227046/
I have refined it alot i’ll bring some better examples to the bash
I made a wood jig to make all the tiles at once with the holes in baked in
then i just cut the strip into tiles while its still hot.
I make mostly ONE OF’s because my friends & employees end up with every thing i make.
I’m always in such a rush i don’t have time to plan well for color mixing i tend to start off with a pearl out of the pack and doctor it a little to fit the project i am working on.
Mabey someone will post a color mixing formula chart for pearls ( hint hint)
thanks
jan
Jan,
I did a huge color wheel using the pearls/metallics and labeled everything with “recipes.” You can see it at http://maggiemaggio.com/color/?p=751. Unfortunately, Polyform has discontinued about half of the colors I used.
Carol