
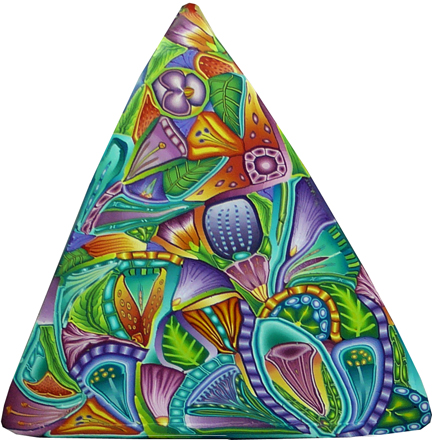
 Here is the master cane after all the components have been added and the cane has been compacted but not reduced. You are looking at a 1/4th inch thick slice I took off the back of the cane with my slicer. The slice is 5 inches from the tip of the triangle to the base.
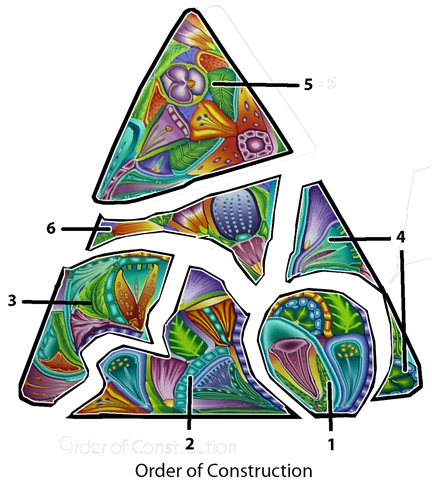
In this post I’m going to talk about adding the remaining four sections. I won’t discuss all the components this time, but I will point out some of the decisions (and mistakes) I made as the cane progressed. The sections of the cane and the order in which I added them are shown below.
As I worked I focused on providing visual separation between the components by
- Putting lighter canes next to darker canes and vice versa.
- Putting simple, plain canes next to more visually complex canes.
- Using neighboring canes of different hues
- Using a variety of cane shapes
- Using “line” canes or thin slices off of shaded blocks between components that were too similar visually.
I also aimed for a feeling of motion, energy, and fluidity.
I went through several iterations of section 3, primarily because of carelessness. I inadvertently allowed some components to touch one another before they were in the correct positions. Because the room was warm they stuck together and I had to pull or cut them apart. Some were so damaged I had to replace them with new components. Another difficulty was that I handled the piece so much that I distorted the profile on the right hand side where I planned to connect it to section 2. (After that I went home for the day – always a good strategy in such situations.)
I used a lot of “line” canes to separate elements from their neighbors in section 3. The most effective were the purple and white stripes and the pale blue “bricks”. The others weren’t as effective because they didn’t provide enough contrast. I also used some slices off of shaded blocks as fillers and dividers. If you look closely you can see a fuchsia one, a teal one and a green one.
As I constructed sections 3 and 4 I added the lower two corners of the triangle. I left section 6 for last because I thought it would be pretty complicated.
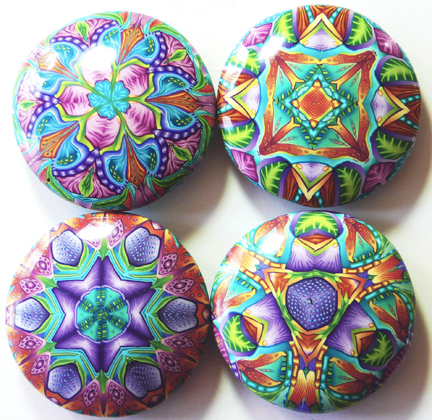 From the beginning I planned to have different colors predominate in different areas of the cane. Sections 1 and 4, combined, make a mostly blue-green-purple region. Section 3 is dominated by turquoise. I planned for section 5 to have red-orange, red-violet and green on one side and blue-greens and purples on the other. I did this knowing that when I cut up the cane and kaleidoscoped the sections I would end up with kaleidoscopes consisting of very different color combinations. On the right are some examples; there will be more in the next post (after I’ve sanded and buffed them).

Wow! This is truly inspirational. I don’t feel that I’m advanced enough to try it yet, but it gives me the incentive to keep practicing and reach a point at which I’d feel comfortable in attempting something ALMOST as large and complicated as this. It’s hard to make myself quit staring at it. Congratulations to you.
Thank you. I appreciate the comment.
Carol,
Thanks so much for sharing your process. Amazing work and an inspiration. Very much appreciated.
Melanie
Thank you Melanie
magnifique
Thank you!
Thank you so much for sharing your knowledge with us!!!!!!
You are welcome. Thanks for commenting.
I’ve enjoyed reading and seeing how you go about your process. The result is beautiful! Thanks for sharing it with us!
This process is absolutely fascinating and inspiring. I need to get my workspace cleaned up asap because you have inspired me to give this a try! I love Judy Belcher’s tesselation and have made many canes with that technique and I have a feeling I’ll be creating several with your technique here as well! There’s just something about kaliedescopes and the multitude of variety you get from one base cane that I LOVE! Thank you SO MUCH for sharing your process!!
Thanks for the lovely compliment, Linda!
Wow, when I grow up, I hope I am as talented as you.
Thank you for the eye candy.
Melodie…age 52 lol
You’re welcome. Glad you enjoyed it.
Pingback: Repetition, Repetition… | carolynbond
Thank you for showing this process and letting us get into the mind of Carol Simmons~! What a treat! I LOVE your work.
The part that confuses me is how you get four different kaleidoscope designs out of one cane. Or did you make four different canes and not picture them?
Beautiful and well thought out!
Thanks for writing Sarah. I can make all those designs because I don’t make them from the whole cane; I make them from slices of the cane. They are one of a kind.
ok, I think I get it. I saw your post on “Designs like Mulitcolored Snowflakes” and it made more sense. So you use mutilate the original cane (for lack of a better word!)? It seems counter productive to ‘undo’ what you have built. Is there a reason why you cut up the cane after you have it all together? Wouldn’t it make more sense to use the pieces you used to make the cane to make a new one? I wish I could see where you cut the cane each time to get the whole picture.
I don’t have to cut up the cane because I never make it into a full kaleidoscope cane it the first place, I keep it a triangle. I do this because I get bored if I have to look at the same design over and over.
This is just amazing. You have inspired me! Thank you for your generosity in sharing all this knowledge.
I’m glad you enjoyed it and took the time to write, Susan. Thank you!
Thank you Ofelia!
This is INCREDIBLE! Thank you so much for sharing this technique. I can barely wait to try this for myself.