
Update (2020): You can see that I wrote this post quite some time ago. At that time, I was making master canes with a very large number of very detailed components. After teaching my master cane technique for several years, however, I found that smaller master canes (with fewer components) were generally more successful – for both students AND for myself. Here is why:
- When you make a cane with fewer components, you can focus on making each component the best you can. When there are lots and lots components, there is a tendency to get sloppy, especially with the final components.
- Lots of components lead to a very large cane. If the entire cane is in the same color scheme, I get tired of the cane before I use it up. I would rather start a new cane in a different color combination.
- You become tempted to reduce your components so that you can use them more than once. This can lead to kaleidoscopes that contain components that are too small for the viewer to appreciate the detail and for the kaleidoscope designs to make a strong visual impact.
- With a smaller cane, you spend less time getting to the point where you can enjoy the fun of making kaleidoscope designs.
I’m working on what will be my last kaleidoscope master cane for a while and I want to get it right. This one has been a real challenge for me because I want to keep the colors really strong, which means not adding as much white as usual. In recent years my kaleidoscope designs have had little or no background surrounding the individual design elements. Rather, the elements are pressed against one another, which means there has to be a strong value contrast from one to the next in order for them to be readable in the final design. I could outline them all in black but that would either produce a stained glass window effect (if the lines are thick) or tone down the colors in the reduced cane (if the lines are thin). I don’t want that to happen, so I have to maximize the value contrast between the edges of adjacent elements.
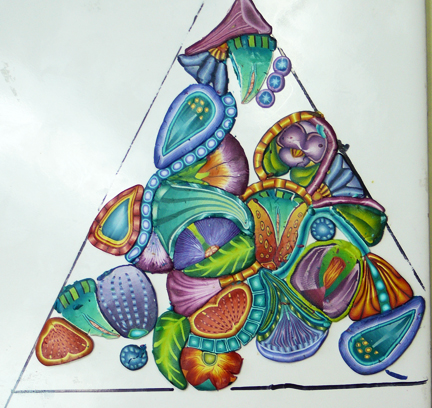
These are the components I’m working with at this point. Each component cane is 3 inches tall. I have sliced off the tops of the canes and arranged them on a tile in one possible design for the master cane. (The triangle is 5.5 inches from top to bottom.) I’m not happy with the results so I’m going to be moving some of the pieces around, taking some out, and making some new ones to fill in gaps as I work towards my final design. If I did this with the actual canes I would risk damaging them, so I will be using only slices. I decided to take you along with me as I work this through to give you a peek at my process. It is the same process students in my 6-Day Kaleidoscope Pendant Workshop use when they build their master canes.

This is fantastic! So great to be able to follow your thinking and your doing, Carol. Thank you so much for your generosity.
Although this is little bits of what I cover in the workshop, I’m hoping it will jog some memories for some of you who have taken it!
This is going to be so interesting to watch. Maybe this blog will hold me over until 2014 when you make it over to Slovenia or the Czech Republic.
I hope you don’t mind my asking for the dimension of one of the above elements, say, the “heart-fruit”-looking item in the lower left corner, to help me envision the full size of your project. And thank you for doing this; I’m so sorry I didn’t find out sooner about polymer clay and the incredibly generous community of clayers.
The entire triangle is 5 1/2 inches from top to bottom. I’ll be there – I hope you will also!
What is the least used color in your canes ?
I’ll have to think about that because I challenge myself with color schemes that include colors I normally don’t like. I suspect my most used color is blue-violet.
Pure Yellow.
Thanks Carol, strange but I just saw this, and right now working on building some kaleidoscope canes! Thanks for sharing this as I can’t afford to take your class as much as I would really love to!:)
Post pictures!
You are so kind to share your process like this. It’s just typical of your generosity as a teacher. Even though I’ve taken your workshop (and will be taking it a second time!), I’m sure I will benefit by what you share on your blog.
Thank you Priscilla!
I agree with Irene. The thinking behind the design really helps. Especially for the color challenged like me.
Thank you for commenting Jeanne. I’m glad to know you find it interesting.
Carol, Thank you so much for sharing. I want to take a class someday, but I think this is the closest I will get, at least for a while.
Thank you pamela.
Thank you Carol for sharing your creative process with us, kaleidoscope canes always fascinated me with their intricate designs and you mastered it, I send you a big hug from Venezuela
A big hug to you too Maria.
Thank you so much for sharing your process! I love kaleidoscopes. I will be watching closely. Your work is amazing.
Thank you Marty.
I am so tickled to be able to follow you. I am so far away from your classes that you have left now. Bummer. Thanks so much for sharing
I am so excited to watch you build yours. I however have given up on mapping and having my finished cane look like the map. Can not wait for the reunion class in May!
I think the mapping just gives you the confidence to proceed with the design. See you in May, Em.
Pingback: The Daily Polymer Arts Blog » A Good Cane Improved by a Fitting Finish
Thanks Carol you really did jog my memory. My cane making has significantly improved over the last 5 years. You’ve inspired me to start a new master cane in a smaller scale
Great, send pictures!