
This is a continuation of my saga with pendant cords that I started in my Nov. 25, 2011 post. Part of the reason for sharing my problem solving process in such detail is to illustrate how something that seems quite simple and even obvious when demonstrated in a class can represent days or even weeks of experimentation by the instructor.
 Before I started using window blind cord I used Soft Glass plastic cording. I liked it because most of the colors were somewhat muted like the colors in my pendants and I thought the frosted hollow cord looked rather contemporary.
 I wanted the cords to be adjustable so I connected the ends with “sliders” I made from polymer clay. Each slider had one hole drilled part-way through it and a second hole drilled all the way through. The cord was super-glued into the short hole and moved freely through the second hole (below).
This type of closure is works successfully with buna; however I found that the glue caused the Soft Glass cord to become rigid and susceptible to breakage over time. (I have since observed that some artists bring the end of the cord all the way through the slider and tie a knot in the end.)
 The picture on the left shows a variation on my Soft Glass sliders. I made tube beads and then sanded one surface flat on each bead. I glued the flat surfaces of two beads together to make each slider. I still had the problem with the glue, though, and on top of that the two beads sometimes broke apart. I still like the look of the cord and may return to using it for some of my pendants. I have an idea for a mechanical closure that would eliminate the need for glue.
 Window shade cord turned out to be more difficult to work with than I had anticipated. It took weeks of experimentation to come up with the gracefully draped version you see on the right. First of all, the cord ends fray easily. That and the softness of the cord make it difficult to feed the cord through the hole in a pendant almost two inches in diameter.
I tried stiffening the cord with glue, paint, varnish and other liquids with little success until I discovered that I needed to use the thinnest super (cyanoacrylate) glue available. Anything more viscous sat on the surface of the cord instead of sinking in. (The fastest setting cyanoacrylate glue is usually the thinnest.) I soaked the first 2-3 inches of cord with glue, let it dry and stiffen, then cut the end into a point to make a “needle”.

The next thing I experimented with was the sliders. I wanted them to be as unobtrusive as possible, which meant they had to be small, and I wanted to avoid using glue.
My solution after more  experimentation was to roll out a sheet of clay matching the color of the cord as closely as possible, then punch out little ovals. Before firing the ovals I poked dots into the surface where the cord holes would go. After firing I drilled out the holes. The holes had to fit the cord exactly or the slider would be too loose to hold its position after the length was adjusted.

The final challenge was to come up with a way to finish off the connection without using glue. The solution, after I came up with it, seemed obvious. I pulled the end of the cord away from the slider, melted it with a candle and after it cooled pulled it up snug to the slider.
The melted cord-end appeared to be a small bead just a bit darker than the slider – an elegant solution to the problem!
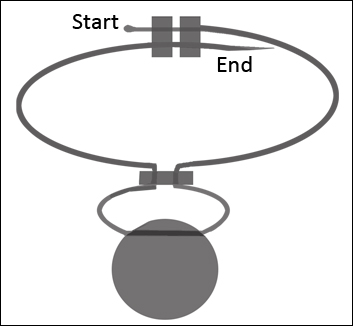
The image on the left shows how to thread the cord through the sliders and pendant in a single direction so that you don’t have to form “needles” on both ends.
For more information on this cord see this earlier post.

Thanks for this fantastic tut. I have a supply of soft glass and I will be trying this in the near future.
Thank you Penny.
Yes–a very elegant solution. As an owner of one of your pendants with the window-blind cord, I never would have guessed that was the material until you posted it on you blog! I marvel at how small you’ve made the sliders and that you added one on top of the pendant to make the cord drape so nicely.
Thank you Priscilla. There will be more about that 3rd slider in Part III.
Great blog, thank you. I love that idea of melting the ends and the tiny sliders. I shall try that out in silver clay – thanks for sharing it.
You’re welcome Joy. I’m glad you liked it!
A million years ago in the 70’s I taught ,made and sold Macrame’ everything.
I was the richest 13 year old i knew!! The cord supply back then was vast in everyway.
All were made from Polypropelene. At the shop where I worked we used a hot plate instead of a flame especially on white so that we did not get a black residue. If you hold it close and let the heat build up and are careful you got a nice clear or same color ball. Cord with any
cotton or jute content would not do this.
Thanks for adding this information, Jan. I always appreciate your comments.
Thank you for all the details. Love your blog.
Thanks for the comment, Lee Ann.
Exactly, Jan! I’ve prowled the aisles of craft stores and have been delighted with the colors and durability of the macrame cord out there; anything made from polyproplene or nylon melts easily. Having an adjustable temperature waxing tool from my jeweler days, sealing the ends is both fast and elegant. The drape and feel of the cord is a huge plus.
Randee, Thanks for sharing. How about some photos on Flickr or Pinterest?
Thank you so much for explaining your trials and sharing your tips. Your work is beautiful and these pendant cord ideas are genius!
Jill, you’re welcome. I’m glad you liked the post!
Thank you for your posts and your wonderful blog. I am coming to Fimohrani in prague, so really looking forward meeting you personally and learn from you :))).
Andrea, It will be great to meet you. Where do you live?
I live in Slovakia…we are very happy you are coming to Czech, which is so close to us :))
WOW! Even though I am very very new to PC I was able to follow and understand all of it. I especially love your ‘simple’ illustrations. I live in Atlanta and haven’t met anyone who teaches PC techniques yet. Hate I read this too late to come to your ?intensive. Now that I know where to look I will follow your blog daily. Thank you for sharing so freely!
I will be teaching a one-day class at Creative Journey Studios in Buford, GA, Sat. Mar 31, 2012.
I wish I were able to attend a polymer/birding workshop! Caning and Costa’s…what a combo! Alas, utility bills take priority.
I haven’t branched out very far in my cord choices. I’ll have to look for some of the suggestions above.
Have you tried “threading the needle” to get your cord through your pendants? Feed a nice fine wire or fishing line through the pendant, pierce the cord a few mm from the end, feed the wire back through, and pull. Might that work, without the hassle of glue? Granted, I’ve never worked with that kind of cord, and don’t know how much tolerance you have between pendant hole and cord, but it might be worth a try!
Your pendants are luscious. They were one of the first things I “pinned!”
Thank you so much, Heidi. I have tried several variations of the threading the needle approach, the doubled up cord won’t fit through the hole and if the wire is near the end of a single cord, I have to use glue anyway to keep the cord from unraveling.
I LOVE your work Carol!!! Your cord idea is great! I’ve only been able to find a very limited selection of cord colors. May I ask where you find your in such pretty, complementary colors?
Thanks!
Where do you get that gorgeous cord .. the purple braided cotton (or nylon?) cord in one of the last photos shown with the little purple sliders?? I’m thinking since you can “melt” a knot into it, it must be nylon? Is that a 3mm? 4mm? I would love to find some of this stuff in black. I’m new to polymer clay and have been playing with buna cord and some old 2mm and 3mm satin rat tail, but I have some Asian designs I’ve been working on with long horizontal beads at the top (like a fat hornpipe), and that braided cord would be perfect!
See related post http://carolsimmonsdesigns.com/2011/pendant-cords-part-i/
This is a great tutorial Carol, thanks ever so much for sharing.
Glad you like it!
I like your window shade cord and the sliders, great idea and really nice and neat looking. It looks great with the small Kaleidoscope Pendant. I love your work.
Thanks for sharing details on making slides and the cord type you use. I’m going to try make the slides from metal for my jewelry.
I have had the same problem with finding a way to close my necklaces. I love your idea thanks
This is so smart. Thanks for sharing.
I’m so glad to finally find your blog. I am enamoured with your work. I couldn’t see a sign up button so I hope this adds me to your subscription list.
Hi Sherry,
Thank you for the compliment. I believe the rss link will ensure you get all my posts. I put a lot of my announcements on Facebook these days as well.
Happy New Year!
Super-clever, wonderfully detailed and very generous share. Thank you for your time and effort, it is greatly appreciated!