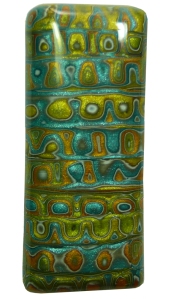
In my previous experiments with large thin sheets of mokume gane, I created essentially abstract designs. Pieces cut or torn from the sheets were applied over flat sheets of scrap clay as in a collage. This time I experimented with patterns and covered mostly three-dimensional forms. I cut linear strips from the mokume sheets and aligned them to form patterns on the surface of the raw clay.
These three-dimensional pieces required much more handling than the flat pieces I had done before. I found I was disturbing the strips I had previously applied as I applied new ones. In the case of the banana slug, I ended up placing new strips over old strips repeatedly until I was satisfied with the results.
When it came to the beads, I held the clay forms on skewers to minimize my handling of the uncured clay. Because the strips I applied were extremely thin (like tissue paper) the beads had to be fully shaped before the strips were applied. Attempting to shape the beads after the strips were applied caused smearing.
In my earlier experiments I found that unless the veneer I created was perfectly flat, I would lose some of it during sanding. Flat pieces could be covered with a sheet of deli paper and burnished until the surface was flat and smooth, but with 3-D forms I had to use a roller and other tools. After some trial and error, I found I got the best results by waiting until the entire bead was covered before applying pressure to join the strips.
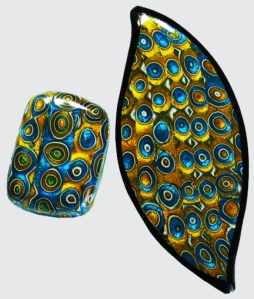
Each of the pieces above has a flat surface made by aligning and joining strips or dots. These next two pieces incorporate raised dots, punched from the mokume sheets with a circle cutter. The piece on the left began as a flat background of strips. After the piece was fired and sanded I added raised, gold-rimmed dots then fired and sanded it a second time.
The piece to the right has dots applied over dots in several stages. It was fired and sanded after each stage. I had to take special care during sanding to avoid sanding off the dots.
 This final piece is a late addition to this post and yet another experiment. This time I aligned the strips edge-to-edge on a sheet of scrap clay and burnished them all together. Then I trimmed the sheet into a rectangle. I picked the sheet up and wrapped it like a blanket around a pre-formed core of scrap clay shaped like a flattened cylinder. I pinched the top and bottom then trimmed and pressed them flat. Finally, I rolled the covered core gently between my hands to seal the covering to the core. There is a seam on the back of the piece.
All of the pieces shown here were sanded with 400, 600, and 1000 grit sandpaper then buffed on a buffing wheel.


Carol, they are lovely and you always seem to turn on my creative spirit. Thanks for sharing all you expertise!
Thanks Marty. I’ve had a great time playing with this.
Carol
What gorgeous beads Carol! I love all the rich metallic colors!
Thank you, Carolyn. I love the metallic colors also. I’ll miss green pearl and copper.
Absolutely gorgeous and I love reading about your steps in the process!
Thank you. The main reason I started this blog was to share what I discover with others. I’m glad you find it interesting.
Unbelievably gorgeous!
Thanks, Marlene.
Very Beautiful, and eye catching. Thanks so much for sharing
Thank you, Joetta. I’m glad you found it interesting.
Carol
you are a amazing artist. I would love to be able to make these.
they really do take your breath away.
Carol, they are stunning. very inspiring too!!
Thanks Tejae!
These literally make me catch my breath–and I thank you for such a lucid explanation of the process—however, even knowing how it’s done, I don’t think anyone could ever reproduce these 🙂
Thanks Randee. I plan to teach them how!
Carol
WOW, these are amazing!
I am floored by the beauty of these pieces. Makes me want to dig out my Premo Metallics and get creative. Just a bit curious. Are you using a texture sheet to get the perfect dot patterns or carving the dots by hand ? My mind just can’t wrap itself around it LOL Distracted by the sparkle 🙂
I make my own texture sheets. That is part of what I’ll be teaching. I find that when I recognize a commercial stamp design on a piece it detracts from my appreciation of the overall piece. So, I make my own.
Carol, it just took my breath away when I saw your pictures. I can’t wait for our class at the Eileen J Loring polymer clay guild in March. I am so thrilled to be learning this method. I bet your translucent experiments will be great too.
Thank you Betty. I’m looking forward to it also.
Carol,
Thank you for giving the detailed explanation of the process. As always, your attention to detail is inspirational. BTW…I LOVE the Banana Slug…the piece and the name!
Thank you Laurie. I’m looking forward to seeing you in Ohio!
Carol your work is some of the best eyecandy I’ve seen in q uite some time. Love it, love it, love it!!!!
Thank you.
Absolutely beautiful! ♥
Sorry for the late reply. I missed this comment when you made it. I appreciate your compliment!
Gorgeous – simply stunning… Will you do a tutorial?
Not in the foreseeable future – too much on my plate right now.
These are well beyond the best pieces of mokume gane I have seen! I love each and every one of them!
Thank you Glo!
Hi Carol, I just love the effect you’ve achieved here, really beautiful.
Thank you Pam!
Just discovered this post today from your Flickr site. I LOVE the dots on dots. How labor intensive, but the results look fabulous.
Pingback: The Polymer Arts Blog » Patterning with Mokume
Carol, these are just stunning and the raised dots make great surface interest!
Thanks!
Carol, these are gorgeous. The colors are lucious and I love the depth you have achieved. The flat stripes with raised dots seems like I’m looking down into a little pool.
Thank you.
I love these beads. Mokame Gane is a technique I have yet to get right but your beautiful pieces have encouraged me to keep trying.
Once you get it it’s hard to stop!
Any pointers or advice for a novice?
I love these metallic beads, they are gorgeous!
I’d like to ask if you have an on line class or a tutorials for them. I am not in US and cannot attend any of your classes.
Not yet. I just don’t have the time now. When I stop traveling I will.
Pingback: Hidden Jewels Workshop with Carol Simmons | The Beaded Bazaar