
When I build a master cane I begin by making a number of individual canes that will become primary components of the master cane. I don’t plan the master cane design ahead of time; rather I make a bunch of individual canes in the color palette I have chosen. I make whatever designs come to mind as I am working. I am trained as a botanist so often the components are plant elements. I rarely make an entire flower or plant; usually the canes are individual petals, small groups of 2-3 petals, or leaves. Whole flowers will appear when sections of the cane are kaleidoscoped.
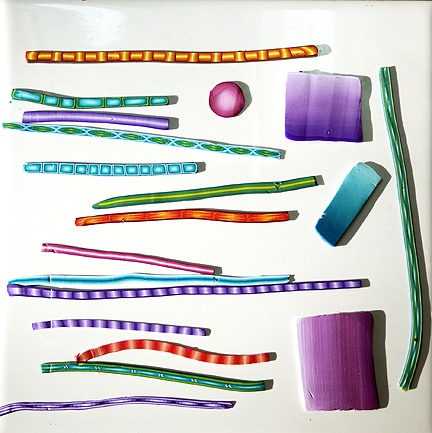
I try to make canes that vary in shape, color, intricacy of design and value (lightness/darkness). When I have what feels like a good number and variety of canes, I take thin slices off of them and start exploring composition by moving the slices around on a tile. These are the canes I made for the master cane I will start designing in my next post. Some of them are left from my first effort (shown in previous posts), others are new. A few are modified versions of the canes you saw in the previous post.

My component canes tend to be quite small in cross-section. I am simply unable to visualize their overall arrangement if they become much larger. (I’ve noticed in my workshops that people vary considerably with respect to the sizes of canes they are comfortable making.) The slices you see above are displayed on a 6 inch square tile, so you can imagine how small they are. In order to have enough master cane to make plenty of unique kaleidoscope designs when I’m done, I make the component canes about 3 inches tall/long.
I also pre-construct a series of what I call “linear elements” that can be used create rhythm in the design and to separate neighboring canes that are too similar in color or value. Finally, I make a shaded bullseye or two and some shaded blocks that I can cut up to create filler for small gaps in the design. I think of these canes as “support elements” in the overall design. They greatly expand the flexibility I have when positioning the primary component canes. Here are some of the support elements for the master cane I will begin designing in the next post.

Your talent and generosity are beyond the ordinary. Thank you!
Thank you Cyndi!
Carol, this series of posts from you – are very helpful – I a-ppreciate your help.
This is SO interesting!!
I am astonished at how detailed your component canes are – I would have expected that a lot of the detail would be lost, or even make the final design hard to read. But your finished kaleidoscopes have crisp designs and instant “eye-appeal” – I can’t wait to see how that works!!
A great read, Carol – thank you!!
Thank you Carrie. It is nice to know people are interested.
i’m so overwhelmed by the generosity you are putting out into the world, may it come back to you 1,000 fold. what a delight this is to follow. many, many thanks from sunny saint pete, florida!! i am adoring you!! 🙂
You are so welcome. Thanks for commenting!
Thanks James.
I enjoy wearing your pieces that I own and it is a special treat to be able to see the process that goes into your complex designs. They are all so beautiful. Thank you for sharing.
I’m glad you are enjoying both the jewelry and the explanation. Thanks for commenting Diane.
On se rend bien compte de la compléxité et du travail que cela représente de construire une telle cane. Merci pout toutes ces explications. Cordialement.
We are well aware of the complexity and work involved to build such a cane. Thank you pout all these explanations. Cordially
De rien, Mary.
This is new for me and its so beautiful, would like to know more about it.
Keep reading!
GORGEOUS Cane slices. I can not WAIT to see what your master cane will look like!
Thank you. You’ll get to see part later today.
I have revisited these pages several times today. New to claying , well new to things other than dollmaking, I love to draw using lots of color and often start with what is called scribble drawing. so for whatever reason your components make sense to me. and oh my what joy you bring with your canes. As a beginner I am not ready to try them for self but it certainly ma;kes me wnt to learn learn learn… Thank you and Happy Easter
Thanks for sharing your appreciation. You have a wonderful journey ahead of you.
I have been doing a serach on your site for the wooden mold you used in the class I went to in Vicksburg, Ms. But, I have noot been able to find it. I would like to order them.
I emailed the information.
Ah, botanists that explains a lot. You’re canes are amazing, I wish I could be at one of your workshops. However, it’s just a wish for now.
I still have much to learn. Reading this has helped with understanding and boosting my creativity. Up until just recently I have just followed instructions from here or there. Yesterday my own creative juices kicked in. Not sure why but you have helped me clarify everything I’ve learned. It feels very natural now. Thank you so much. I know I just found you but I’m thinking this is going to be fun. Never thought I’d be working this hard after I retired, because I want to lol. I will definitely be checking out all your teachings
Carol, thank you for the wonderful info. Your canes are beautiful!
You are welcome. Thank you for commenting.