This post was nearly finished yesterday then something happened with WordPress and I lost it all. Hope I can remember what I said!
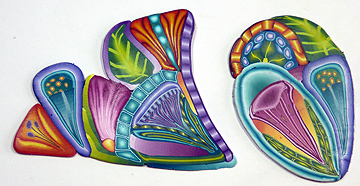
I had planned on describing the construction of a new design for the master cane from the cane slices I showed in my last post. However, as I worked on the design I realized I could provide the same information (why I did what I did) when I was actually building the cane. So, I won’t describe the design phase. The results are shown below. You can see that I didn’t finish the design; I seldom do. I’m an impatient person so once the design is developed to the point where I feel I know where I’m going with the cane I stop designing and start building the cane. (Also, I always deviate from the design to some extent when I build the cane, so it doesn’t pay to fuss too much with the initial design.)
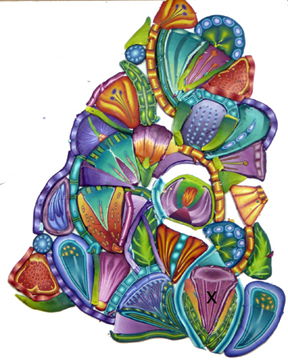
The X marks the spot where I started. Although I didn’t finish the plan it served its purpose. Unlike the first plan this one had rhythm and continuity as well as more contrast between the elements. I learned that most of the linear canes I had planned to use to separate the main elements of the design weren’t going to work because they didn’t provide enough contrast. I decided to keep some and supplement those with simple slices of shaded rectangular blocks made from Skinner Blends and wedges cut from shaded bullseye canes. In this post I’ll talk about building the first section of the cane starting in the lower right hand corner. These are the canes I used for the first and second sections of the master cane:
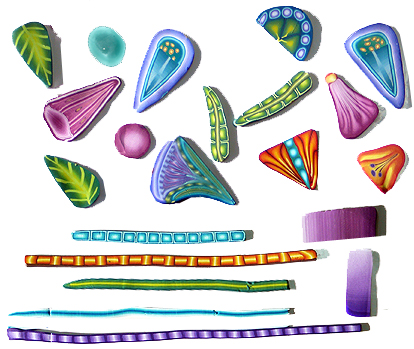
(The collection above should include a slice off of a shaded orange block but the picture was taken before it was made.)
The first section I built looked like this:
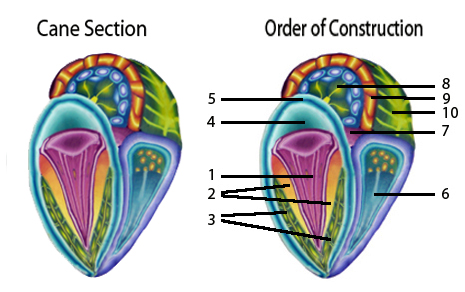
I started with the pinkish, trumpet shaped “flower” (1). Initially I had planned to place the leaves right next to the flower but changed my mind for this reason: Although the colors of the flowers and leaves are quite different they are similar in value and would blend together visually. I needed to separate them to make the final design more readable. First I added the narrow white margin around the lower part of the flower cane but this didn’t provide enough separation so I added wedges cut from a shaded orange block (2) along the sides of the flower. The wedges were effective because they were (a) lighter in value than both the flower and the leaves, (b) simpler in design (plainer) than the more detailed leaves and flower, and (c) wide enough to provide good separation (the white margin wasn’t). The wedges’ shading made them more interesting than a simple sheet of orange clay would have been. After the wedges were in place I added the leaves and pressed everything together to eliminate and gaps.
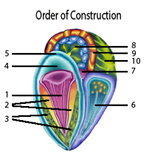 The orange wedges served a second purpose in the design: they supported the flared top of the flower. First I pressed the flower cane into the shape I wanted, then I formed the orange wedges so they would fit the curve of the flower. This is an important point. When you put two pieces together you want to be sure each piece is shaped appropriately before you put them together. Trying to shape one piece by pressing on the piece next to it is seldom successful.
My next goal was to create an oval shaped shaded line around the flower. Because the top of the flower didn’t have the curve I wanted I added half of a shaded bullseye cane above the flower (4). I cut the cane in half lengthwise and used a rod to curve the flat side before placing it on the flower. Then it was ready to add the oval line.
Except it wasn’t. It is quite difficult to make a wrapped sheet of clay form a smooth curve in a cane. For that to happen the perimeter of the cane inside the curve must be perfectly smooth. My cane had small bumps where the leaves met the yellow wedges. I had to smooth the tops of the leaves down to blend smoothly into the orange wedges before I could add the sheet to form the blue line. I did that then added the sheet (5).
Next I added the piece with the orange dots (6). Before I added it, I elongated and curved it to match the curve of the oval.then I pressed it in place. I wanted to preserve the cusp-shaped separation between the new piece and the oval so I cut a wedge out of a shaded maroon bullseye cane. I used rods to press the flat sides of the wedge into gentle curves to match the sides of the gap before putting it in place and pressing it against the canes (7).
I added the last three components in the order show, shaping each to match the cane supporting it before I put it in place. The leaf cane had rounded corners initially. If I had wanted to maintain the curve on the inner corner I would have added a small cusp-shaped triangle to support the curve.
At this point I made sure all parts of the cane were pressed firmly together and no gaps remained. This was easy to do because I had taken care to eliminate gaps as added each component. I put this part of the cane aside and started building the neighboring section (below). I will tell how I did that in the next post.