
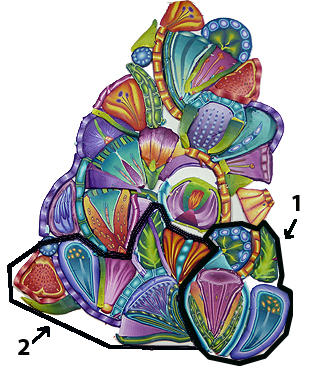
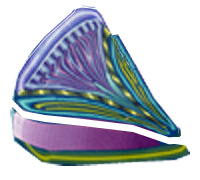
Section 1. In the previous post I constructed section 1. Here is another look at the plan and section 1 as I constructed it.
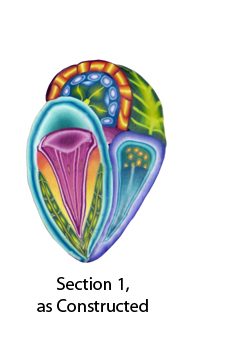
If you compare the two pictures you can see that I generally followed the plan in regard to the component canes I used, but their shapes and dimensions turned out to be quite different in the cane. This is always the case for me. Entire component canes behave differently than slices off the tops.
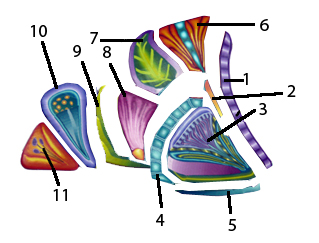
Section 2.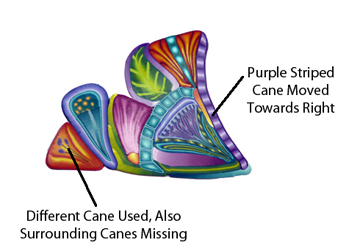 My construction of section 2 is shown on the right. You can see there are several areas where I diverged from the plan (above). I made the changes because when I started to assemble section 2 I placed it next to section 1 to see how the two sections would relate and found the energy I had hoped to create just wasn’t there.
The canes I was adding were too simply close in color and value to the canes that were already there to produce the contrast I wanted. I decided to use the purple striped cane to separate the two sections. Because of its high contrast in values and it’s eye-catching striped pattern it enlivened the transition. I also replaced the three mid-value canes in the lower left corner with a single cane. The “California poppy” cane’s sharply contrasting yellow and red-orange color and its simple design added another energetic element to the design. The cane section was essentially “bookended” by strong elements. A third strong element (the dark orange flower) topped off this section of the cane.
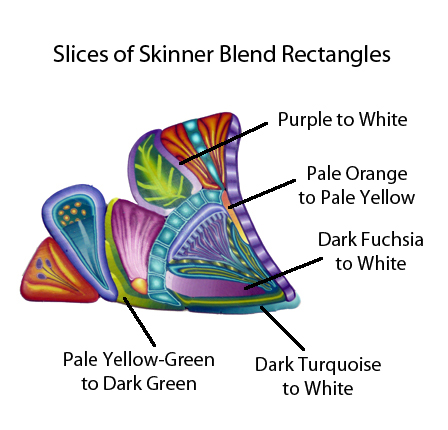 To provide added separation between the patterned elements I increased the number of Skinner blended slices in the cane. These slices are from blocks made by rolling Skinner Blends into long strips then cutting the strips into rectangles and stacking the rectangles from light to dark to form shaded blocks of clay. The blocks were elongated to 3 inches, the height of the other components, then sliced into thin slices.
A note about color in the cane: I used only primary colors, a bit of black, and lots of white in the cane. The secondary colors (orange, green and purple) and all the others were mixed; they were not packaged colors. In addition, all of the colors I used were “toned down” slightly from their rainbow equivalents. I added a tiny bit of the complement to tone down the hue and white to enhance the value gradation in my blends.
Construction Technique
The more you work with a cane, the more opportunity there is for it to become distorted or pick up flecks of clay from the surrounding area; therefore I set section 1 aside and began section 2. I wanted to start with the purple striped cane but without section 1 there was nothing to support it. I solved this problem by using a glass jar to support the cane and maintain the curve while I worked.
 I often find it is easier to combine individual subcomponents before adding them to the main cane. The flower on the left was constructed as a single component cane early on. Before I added it to section 2, however, I attached the fuchsia blend and the “grass leaf ” cane. Adding these parts before attaching the flower cane allowed me to press them firmly against the flower cane without having to worry about distorting the purple striped cane. Following the same strategy I placed the purple-to-white blends on the two sides of the upper leaf cane (7) before adding it to section 2.
 I worked outward (to the left) from the purple striped cane supported on the jar. As was the case with section 1, all of the curved elements were curved by pressing them against a glass or rod before adding them to the cane.
A couple of words of caution…
- The clay I use (Premo) is often soft enough that one piece touching another can become stuck and impossible to remove without damaging one cane or the other. This is the case even though I leach nearly all of my Premo clay before I cane with it. When I have to place two pieces together to check a fit I dust them thoroughly with corn starch first so I will be able to separate them easily. When I come to the point where I want them to adhere to each other I rub them with a little clay softener to eliminate the effect of the cornstarch.
- Every time you add a new component to a master cane I suggest you check to see that the cane extends all the way to the bottom of the master cane and will fit against it for its entire length before you press it into place. If you only look at the top you are likely to end up with gaps and missing sections of cane at the bottom.