
In this post I explain how to make a pattern for a blend between two colors of clay to produce a desired color gradient.
When Judith Skinner introduced her revolutionary blend technique, she started with two triangles of different colors lined up along their hypoteneuses to form a rectangle. As I explained in a 2011 post, the straight line between the colors should be a curve if the goal is to create an even color gradient. That is:
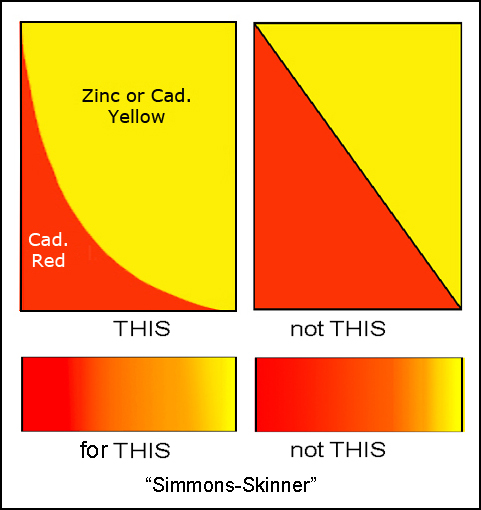
This post explains how you can determine the shape of that curve. Before I do that, though, I should remind you how to mix simple color scales (a concept Maggie Maggie introduced to the polymer world.)
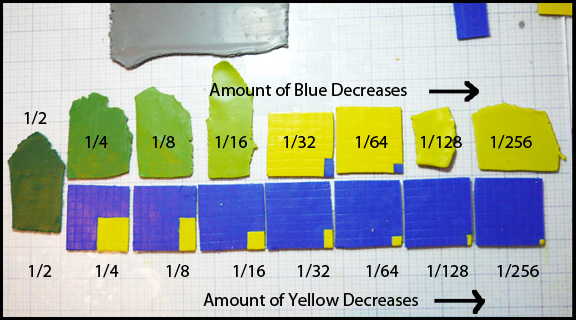
This image shows color scales between zinc yellow and ultramarine in progress. Look first at the bottom row. It shows how the clay was measured out before mixing. On the far left is the 1/2 and 1/2 mixture of the two colors. Moving from left to right along the bottom, each square contains half as much yellow as the one before it. In the top row the yellow increases toward the right. This type of sequence in which an amount is halved (or doubled) in each step is called a geometric progression. This 2011 post explains the process in more detail. A second approach is described in Polymer Clay Color Inspirations, a book by Maggie Maggio and Lindly Haunani.
Before you can create your pattern you must mix the geometric progression for the two colors you are using. After mixing the clay roll into into thin sheets and punch 2 small circles in each mixture. Leave everything on your work surface, labeled, until you are ready to use it.
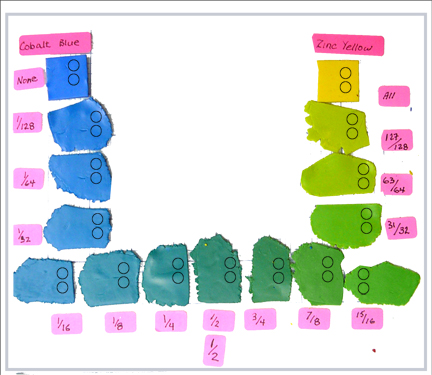
Color mixtures from cobalt to zinc on labeled sheet of glass.
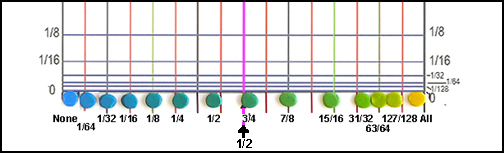
You are going to place one set of dots along the bottom of a sheet of graph paper that looks like this.
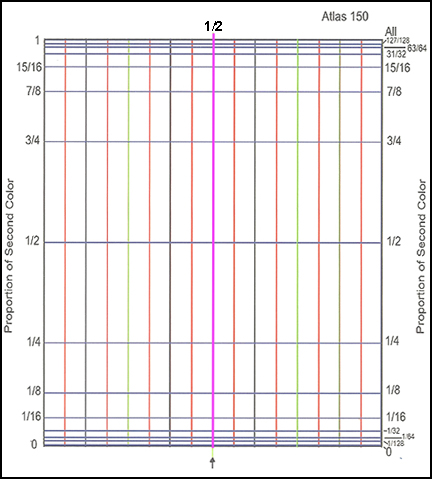
“Log-Normal” Graph Paper for Blend Patterns
This paper looks complicated, but it’s not. You can make it yourself:
- Draw a rectangle the width of your pasta machine and as tall as you want your sheet of clay to be.
- Draw a vertical line down the center. Write 1/2 just above it.
- Draw several equally spaced lines to the left and the right of the center line.
- Measure halfway up from the bottom line of the rectangle and draw a horizontal line all the way across. Label it 1/2 at both ends.
- Measure 1/4 of the way up and draw a horizontal line all the way across. Label it 1/4 at both ends.
- Measure 3/4 of the way up and draw a horizontal line all the way across. Label it 3/4 at both ends.
- Do the same for each of these proportions: 1/128, 1/64, 1/32, 1/16, 15/16, 31/32, 63/64, 127/128. The graph should look like the picture above.
Place the graph inside a sheet protector so the clay dots will stick to the surface. Arrange the dots along the bottom line of the graph, spreading them out the way you want the hues spread out in the final blend. Ignore the vertical lines while you do this. (Note: the fractions on the bottom will not be on the graph – they are put here to indicate the proportions of the two colors in the mixtures.)
Graph with dots spread across bottom. (Labels are not necessary.)
Now you are ready to put the second set of dots on the graph to form the curve. The general idea is to put each new dot directly above its identical partner. The distance above is determined by the proportions of the 2 colors in the dot. For example, the 1/2 blue and 1/2 yellow dot goes right on top of the hoizontal line labeled 1/2.
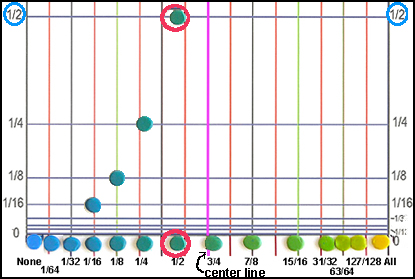
Notice that the dot is more than half way across the graph even though it is half yellow and blue. That is because the mixture is blue-green and I want the center of the blend to be green. The 3/4 mixture is closer to true green. Repeat this step with all of the other dots. When you are finished your graph should look like the bottom left. 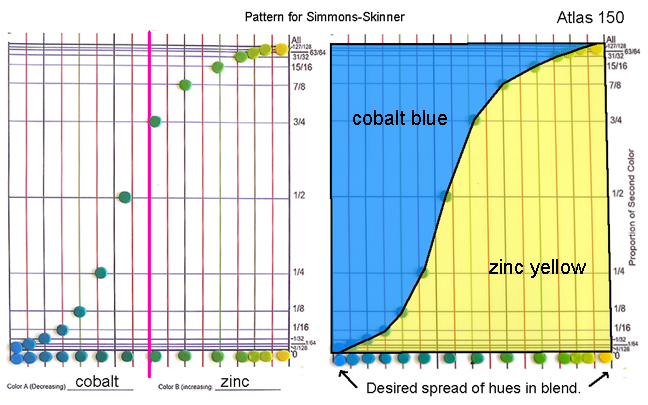
To make the pattern, mark the locations of the centers of the dots on a new sheet of graph paper. Connect the dots, draw a rectangle around the outside and your pattern is finished. Notice that the curved line does not go all the way to the corner on either side. This ensures that you will have a narrow strip of the original colors at the beginning and end of the blend. Label the pattern with the colors you used as shown above. This is important because the pattern for each color combination will be different.

Wow – Carol. Thank you so much for sharing this. I’ve struggled with my Skinner blends since they don’t produce an even graduated spectrum of color, but rather turn out like the one in your initial photo. That in turn severely limits the ‘usable’ area if I’m looking to capture the gradations, with the rest – which is primarily a solid color – going into the scrap heap.
I’m looking forward to your three-color blend suggestions!
Thank you again for sharing your expertise!
Thank you. Can you give me an example of a 3 color blend?
I too would like to know how this works with multiple (3-4) colors. I noticed that this message is dated 2016, but I didn’t find an answer. If there was one, please direct me to it. Thanks a bunch.
I have only done it for 2 color blends.
Thanks.
Hi Carol. First, Your work is fabulous! I am a newbie to Polymer, spent 20+yrs in Scrimshaw and other detail oriented forms (Xmas ornaments), and wonder if you could recommend classes (yours-beginning) or references. I need mechanics and process. Have retired after 2nd career (RN) and ideas are running wild. Thanks
Amazing!
Pingback: Making Gradient Blends in Clay – Polymer Clay
Will give this a try…thank you…
So cool! Thank you!
I appreciate you showing the mathematical “why” for this technique. This is great and I’m sure I’ll be using this in the future.
Thank-you for freely teaching so very much in an easy-to-understand way
You are so welcome. I love to share.
Thank you, so much. I was having a rough time getting the blends I wanted. I wish they had taught math this way, when I was in school.
Pingback: July Demo: Foolproof Blends – Tallahassee Polymer Clay Art Guild
Pingback: July Demo: Video and Materials – Tallahassee Polymer Clay Art Guild
Pingback: Mezcla Skinner o degradado con arcilla polimérica - www.artesaniaparatodos.com
I love clay and I love color theory. I also love math. This is nothing short of ingenious, Carol! I can not thank you enough for taking the time to share your hard work with the community! Figuring stuff out for oneself is one thing, figuring out how to teach it to others is a whole other level! This post is perfect. Easy to understand and to follow. You have covered the how and the why, presented it with all information needed and without any information not needed. Impeccable.
Thank you very much, Charlotte!
While I appreciate the mathematics behind the mixing and graphing, it would take far less time to simply cut 2 colors of clay and see what you get. As long as you save your cuts either by making a paper template or taking a foto, you’ll be able to reproduce the blend.
Your way would require an infinite number of mixes to cover all possible combinations. My way gives you recipes for all proportions of the two colors, not just one.