
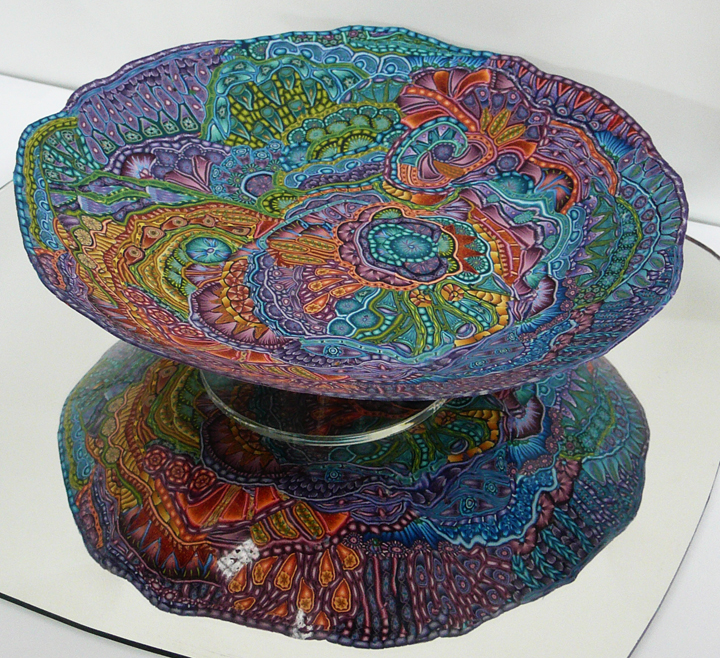
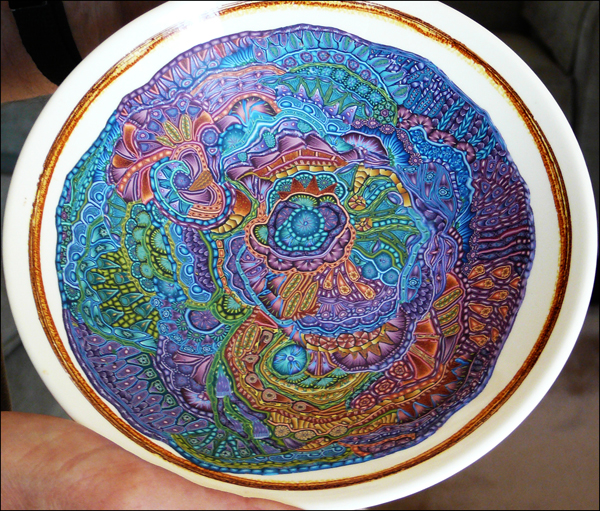
 I promised my friends on Facebook that I would explain how I made my “Tide Pool Bowl” (above) so here goes.
My intent was to celebrate the diversity of Pacific Coast tide pools as I recalled seeing them as a child. (If you haven’t read the two previous posts you might want to start there, first Mixing Muted Color Blends; then Tide Pool Update. In those posts I talk about how I mixed my first color blends and started building the design.)
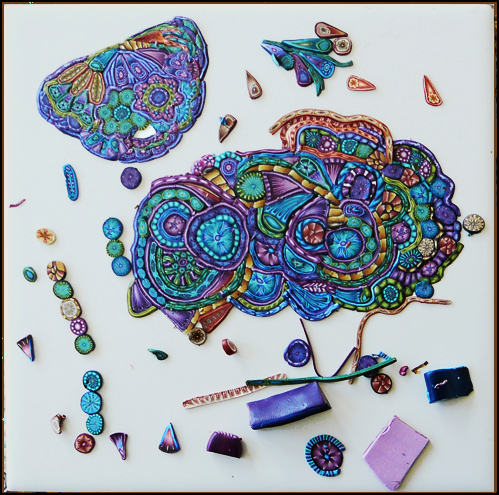
The first thing I did was build a variety of canes evoking tide pool organisms (to me), slice them up and start combining them to form a design on a tile (above). I tried various arrangements and evaluated the results for color (hue and light/dark contrast), readability of the design, and the overall feeling I wanted to convey. I went back “to the drawing board” several times to mix more color blends and make more canes.
The canes were a challenge for me because they were reduced to such a tiny size (about 1/4 inch for the round ones). I kept putting in too much detail which caused the designs to become unreadable after the canes were reduced. The canes were mostly of three basic shapes: round, linear, and more-or-less triangular. You can see all three types in the image above.
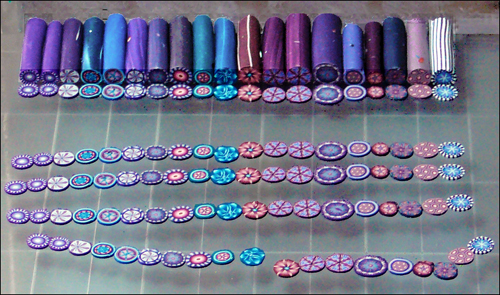
I lined up a bunch of canes on my slicer and sliced a number of them at the same time (above) using a 3/64 inch thickness setting. I did them in batches of similar colors and stored the slices in color families on plastic sheet protectors over card stock. Some of the linear canes are shown below.
 Once I decided how I would approach the design I switched to a (flat) glass work surface large enough to hold the final design. To assemble the design I simply placed slices side by side without any intervening spaces.

It may seem counter intuitive, but I find extremely thin slices much easier to work with than thicker ones. Thin slices are more resistant to distortion simply because there isn’t so much clay to move around. Because they are all the same thickness there is little risk of sanding through them during finishing. I transferred the individual pieces on a sheet of card stock and slid them off of the card and into place with a needle tool. Otherwise they tended to stick my fingers. I didn’t press the pieces together until I had completed the final design.
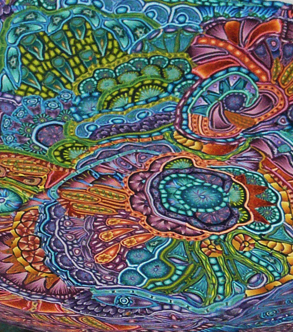
I created a design somewhat like a crazy quilt because I wanted to use lots of color combinations and try lots of designs. Many tide pool organisms are fixed in place and grow colonially so it is not unrealistic for them to be grouped in irregularly shaped patches. I tried to create a feeling of movement because one of the strikingly beautiful things about tide pools is the way the organisms wave back and forth as wavelets move through them. Here is a close-up of part of the bowl.
Once all the pieces were in place I covered them with deli paper and burnished the entire surface with a spoon. Then I covered the paper with a heavy sheet of glass and slid it around while putting pressure on it to level the clay surface. I paid special attention to the edges to make sure they were smooth and of the proper thickness. At that point I had a somewhat circular, irregularly shaped sheet of clay over six inches in diameter and only 3/64 inch thick. I was hesitant about transferring it to a bowl because I was afraid of damaging it; however, I took a deep breath and separated it from the glass with one swift pull of an 8 inch floor scraper blade (one of my favorite tools). As I lifted it my husband slid a piece of card stock underneath it.
I wanted the bowl to have a gently curved profile and I found the perfect bowl for that in a thrift store. My husband and I slid the sheet of clay off of the card stock and into the bowl, intentionally placing it slightly off center. Starting at the center I smoothed the clay down against the bowl taking care not to trap air underneath it. It was easy to avoid distorting the sheet of clay because it was so thin. If it had been thicker there would have been ripples along the edges to contend with. I smoothed the inside with a corn starch filled pouncer and checked again for bubbles. I found a few and pricked them with a pin to release the air. To be on the safe side I baked the (Premo clay) bowl for longer than the recommended time, about 45 minutes.
When the bowl had cooled but was still slightly warm I gently lifted it away from the outer glass bowl with a steel potters rib. I kept it inside the glass bowl while I sanded and hand buffed the inside surface. (Very little sanding was needed.) I left the glass-like outer surface produced by the glass bowl untouched. The bowl is quite flexible but it held its shape when I placed it on a pedestal over an enlarging mirror for display. While I could have used thicker clay slices to make a sturdier bowl I decided to keep it as thin as possible to show off this property of the clay.

Thank you for sharing. You certainly achieved the desired effect. As a diver I can appreciate the tide pool points you thought thru. It’s amazing.
Thank you Karen. I especially appreciate having your diver’s point of view!
That is beautiful, Carol. Thanks for the play by play explanation. Smiles
Thank you. i thought it would appeal to tiny cane-makers.
Oh heavens Carol, the parts are so much more than the sum! It constantly amazes me how you can see ahead from such tiny beginnings, and have that true sense of color continue throughout with nary a misstep. Your best piece ever.
Wow! Thank you Randee!
It is fabulous! I love your process, which for me is the best part. Thanks for sharing this.
Thank you for commenting Cheryl.
Carol,
I just want to sit and study it for an hour. I started to say, “simply gorgeous,” but there isn’t anything simple about it. The complexities go splendidly together, however, and I love that it is thin. The undulating patterns are absolutely mesmerizing. I really enjoyed reading about your process.
Thank you Mary Anne. As a great admirer of your work I especially appreciate this compliment.
That is really stunning, Carol! I especially like the first photo!
Barbara
Thank you Barbara.
waouh !!!! as usual, the result of your work is beautifull and thanks for this process. have a nice day ! kisses from France
Thank you Chantal!
Amazing work ! i’mnot a “caners” but i like so much yours and your creations ! colors ar vibrant !
Thank you Ilenia!
Thank you for this explanation Carol! I’m a big fan. Being into making bowls myself, I really wondered how you had made this. There are tips there that I surely will try. Like the big scraper, brilliant!
Thank you Line!
Ammazing product! The color combination is absolutly astonishing! I love every bit!
Well done
Thank you Dalit!
Stunning. Thank you for sharing.
You are welcome Leanna. Thank you for commenting.
I saw it on FB and thought is was beautiful but i did not realise that it was an all clay bowl, it looked like you covered a glass bowl.
Now i saw it here much closer an it is absolutely stunning!
Well done!
Thank you Karolina!
Carol, This is so gorgeous!! I have been working with polymer clay for about 8 years now and no one has inspired me to make canes like you have with this piece! I love how you took the symmetry of the canes and created asymmetry and an organic look. WOW!! The colors are fabulous and you have totally inspired me beyond belief. I spent 13 years living in Washington State, we travelled down the coast all the way to the CA border camping and beach combing and my best memories are finding fantastic tide pools on the beach. Sea anenomies are my favorites.
Thank you Heather. Aren’t tide pools wonderful?
What an absolutely stunning work of art! It combines two of my favourite things…colour and detail. You give this beginner something to aspire to, perhaps say in 20-30 years!! Thank you so much for sharing the processes involved in obtaining such beauty.
Thank you Jackie. You can probably guess that color and detail are among my favorite things also. I appreciate that as a beginner you took the time to comment. You have a wonderful journey ahead of you.
That bowl is just beautiful, I am just starting in wirework, but your clay items are so great I may even try clay. Thank you girl.
If you love color,Tina, you have to try clay as well. Thank you for the compliment!
As Heather said, this is inspiring beyond belief. It even makes me, pretty much a “non-caner,” want to make more canes. It really does have the feel of a tide pool, and I love things with an organic feel.
Thank you Jan!
Thankyou so much for the detailed explanations of not only the whys and ways of constructing the piece, but the thought processes behind each stage. Its incredibly valuable and interesting to me, and I’m sure, other artists.
I’m glad you liked the details!
I am speechless! This is such a stunning work of art! I love it when you can look at something a million times, a million different ways, and still see something new each time. That isn’t always easy to do. I especially appreciate this as a person born and raised in the hot, dry, Arizona desert. I have no experiences with this type of natural beauty and this gives a wonderful portrayal! As others have said, your use of color is masterful! Each piece looks absolutely perfectly placed and balanced by all surrounding pieces. They ebb and flow together, if you will.
I know I am more than a little late to this party, but it is such a stunning piece combined with getting to read about your process (I love to see how art comes together for different people) I had to stop in and share my admiration with you. I found this while looking for a tutorial on how to create a cane slicer on Pinterest.
Such an inspiring piece! It makes me want to get my canes out and create something right now!
Thank you so much for the compliments, Ruby!
This is the most incredible work I’ve ever seen! I am thinking about learning how to do PC work(s) and this gives me encouragement towards what kind of amazing things can be created!
I tried your bowl tutorial & LOVED the small jewelry bowl I created. Thank you for sharing!
Thank you for sharing this amazing work, with us. The colours particularly the blues and purples are so indicative of the richness of our oceans and what are referred to in Australia as rock pools.
About twenty three years ago I made a series of PC canes capturing the colours and designs of Australian Aborigines. You have inspired me to re-create.
The colours particularly the blues and purples are so indicative of the richness of our oceans and what are referred to in Australia as rock pools.
About twenty three years ago I made a series of PC canes capturing the colours and designs of Australian Aborigines. You have inspired me to re-create.