
Note: I have just posted my USA teaching schedule for 2014. You can see it here.
It has been a gorgeous autumn here in Colorado. I’ve been immersing myself in the beauty of the season by making autumn leaves from my hidden jewels mokume sheets. The organic patterning of the sheets has often conjured images of leaves in my mind. I’ve been using portions of sheets to make leaves for years. This time I aimed for an autumn palette that mimicked the colors around me. I mixed my Premo mica clay with small amounts of zinc yellow, ultramarine and cadmium red to obtain the rich russets, wines, golds and olivey-greens of autumn.
In the past I’ve incorporated leaf motifs in pendants, earrings and brooches. This time I wanted a larger canvas for the leaves. As I thought about how to do this my eyes fell upon a set of wire baskets hanging in my studio. They had been there so long I had forgotten about them. Now I realized they contained the perfect canvases for my leaves: gourds. Each year about this time I collect three or four of the mineature green gourds sold for holiday decorations. I place them in the hanging wire baskets where they eventually dry out. I collect them because I love the shapes and have imagined someday I would do something with them.

It was easy to prepare the gourd for a veneer. I sanded off a few blemishes; then I coated the gourd with acrylic gel medium and let it dry. Meanwhile I conditioned some scrap clay and rolled it out on the thinnest setting of my pasta machine. I wrapped the sheet around the gourd cutting off any overlap so that the edges would abut. I pressed out any bubbles then smoothed the seams to join them. Before I baked the gourd in the oven I drilled a tiny hole to let expanding air escape. When the gourd was cool I gave it a quick sanding and rubbed a light film of clay softener into the surface.
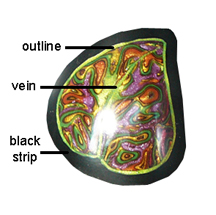 I made sure all of the mokume sheets were the same thickness (#4 on my pasta machine). Then I cut the leaves from the sheets freehand. I created a bright outline around each leaf by rolling out the colored mica clay into #4 sheets, cutting extremely thin strips off of the edges (1/16 in) and then wrapping a strip around the perimeter of each leaf. In some cases I also cut into the leaves and inserted strips for veins. Next I rolled black clay for the background on a #4 setting and cut a wide strip which I positioned outside the outline. (See the diagram, right.) I burnished the parts together then when all the leaves were ready I placed them as close together as possible to cover the gourd. Where there were small gaps I cut a piece of black clay to fill the gap. When I had filled all the gaps I burnished all the seams together and baked the gourd in a bed of corn starch.
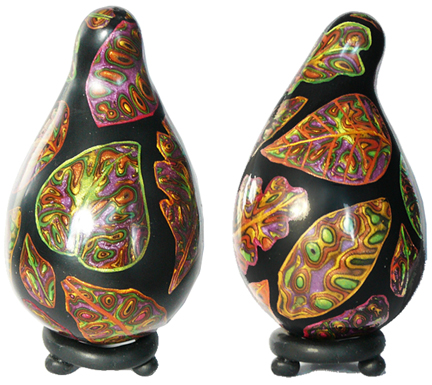 Finally I sanded and buffed the gourd to a high shine. I wanted the leaves to stand out even more so I went back and sanded the black background to a matte finish. I’m looking forward to doing more work on gourds in the future.

Nicely done! And thanks for sharing the ‘how’
Thank you for commenting Linda.
You just saved a basket of gourds!!!! I love gourds and played around with them for a minute. Then got too busy to continue working with them. Your mokume gane leaves are such an inspiration and very beautiful. Since it’s not cool to copy your idea or technique, you have inspired me to not give away my basket of gourds. Thanks so much for sharing your work, it is very much appreciated.
Regards,
Georgie
georgie, Its fine with me if you want to cover gourds.
What a generous surprise! Can’t wait to give it a go. You are the color queen, by the way. Love to see what you will do next.
Thank you Mary Anne.
Love your work too, Mary Anne.
OH, how exquisite and so masterfully, thoughtfully done~! This reminds me of the traditional eastern European egg painting done for New Year celebrations.
This is such a beautiful post, and to think I have been watching for something far less visually exciting–a blog on reducing without creating so much wasted clay!
Thank you for the lovely compliment Jody.
The stand is just perfect…
I made it for an egg but it works for the gourd as well.
These are gorgeous…I’m forwarding this to a BFF of mine who grows gourds in her backyard…I was there last week and some are large enough to make baskets for small waste cans…the small ones are used to make Yerba Mate cups…I’m going to beg for one of the large ones to make a purse…
Just a suggestion for making the leaves pop more…try texturing the background with a brush or sand paper…similar to textures used by K. Dustin & G. Diffendaffer…
Great suggestion on the texture, Brenda.
Would love to take one of youe classes…think you’ll ever make to California?
I would love to teach a class in California but attempts at organizing one have fallen through. My schedule is full through the spring of 2015 so if it happens it will b a while.
Beautiful Carol !!!
Thank you Jan!
Beautiful! Thank you for the step-by-step 🙂
Thank you Carrie!
These are gorgeous! Thank you for the details of how you achieved the edge of the leaves. I don’t have any gourds, but my thoughts are turning towards other uses for this. Such a perfect fall idea 🙂
I’m glad yoo liked it Linda. I appreciate the comment.
These are beautiful and I love you comment about looking at a colorful basket that you had not really looked at closely for a while and seeing it with fresh eyes. I thanks you for the details in your thinking and construction; it will be helpful to me! I love your use of color!!
Thank you Mary!
Carol,
Beautiful!!! Thank you for sharing the process. I will start looking for gourds to cover…a basketful would make a beautiful holiday centerpiece.
You deserve a beautiful fall after the challenges of the September rains.
laurie
Thank you Laurie.
I noticed your 2014 schedule does not include any USA classes…will there be any? I notice you where in SA, TX. this year…any chance you will be there in 2014-15…we are planning on locating there sometime next year or by 2015…Hubby retires from Homeland in Jan…Son lives in SA…Daughter in Houston…
I have just posted my USA 2014 classes http://carolsimmonsdesigns.com/schedule/.
Thank you so much for sharing your technique. Your work is beautiful and I can hardly wait to give it a try.
Enjoy!
Like your eggs, I just want to pick those up and hold them and feel them, they look so silky smooth. I also looked at your class schedule, and wonder, no egg class next year? I want so badly to know how to do the eggs, LOL. Smiles
It is hard to fill the egg class. Usually I offer the option of doing it as an add-on to the bracelet/pendant class.